Introduction
You rent or buy a warehouse unit, and on paper, the square footage looks more than enough. Then inventory arrives, equipment moves in, and within weeks you're navigating around obstacles, losing time searching for items, and wondering where all the space went.
The frustrating part: the space didn't shrink. The layout just wasn't designed for how the space actually gets used.
The right layout determines how much you can store, how efficiently people move through the space, and whether core activities — receiving, picking, packing, shipping — support or get in each other's way. According to SC Solutions, a well-designed layout can increase storage capacity by up to 40% — without adding a single square foot of floor space.
What follows covers five proven warehouse layout types, with design examples for a range of uses — small business fulfillment, contractor storage, creative studios, collectors, and RV or boat owners.
TL;DR
- The wrong layout wastes square footage, slows operations, and drains money — often without an obvious fix
- The five most effective layouts are: Straight-Flow (I-Shape), U-Shape, L-Shape, Zone-Based, and Vertical Storage
- Layout performance depends on your footprint shape, number of access points, and primary use case
- Vertical storage — especially mezzanines — delivers some of the highest ROI for fixed-footprint spaces
- Spaces with customizable features like mezzanines let you match the layout to your needs before you move in
What Makes a Warehouse Layout Effective?
A warehouse layout is the planned arrangement of functional zones — receiving, storage, picking or work areas, and shipping — within a fixed footprint. Without a deliberate plan, spaces fill reactively as items arrive — and reactive layouts consistently underperform because they're built around short-term convenience, not long-term workflow.
Three principles separate effective layouts from inefficient ones:
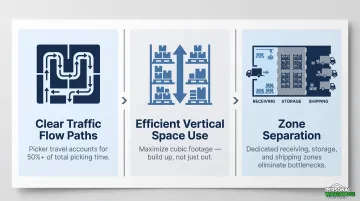
- Clear traffic flow paths that eliminate unnecessary movement (picker travel time already accounts for 50% or more of total picking time in most operations)
- Efficient use of vertical space — floor square footage is only half the equation
- Zone separation that keeps receiving, storage, active work, and shipping from competing for the same area
These principles hold across settings, but how they apply depends heavily on use case. A small e-commerce fulfillment operation prioritizes pick-path efficiency. A personal collector's unit needs open floor space for display and access. An RV storage facility needs drive-through clearance above all else.
The right layout matches the dominant activity — not every possible secondary one.
Best Warehouse Space Layouts & Design Examples
The five layouts below are selected for their versatility, space efficiency, and applicability across both business and personal warehouse uses. Each performs best under specific conditions.
Layout 1: Straight-Flow (I-Shape) Layout
Goods enter at one end, move linearly through receiving → storage → picking/packing → shipping, and exit at the opposite end. No backtracking or cross-traffic — workers and inventory move in one direction throughout.
This is the most operationally efficient layout for high-throughput businesses. By keeping inbound and outbound processes physically separated, it reduces congestion and sharply cuts transit time. It works especially well for e-commerce fulfillment, distribution, and light manufacturing — any operation where goods move in volume and speed matters.
The tradeoff: it requires a longer rectangular footprint and dedicated dock doors at both ends, which limits where it's viable.
| Factor | Detail |
|---|---|
| Best For | E-commerce fulfillment, distribution centers, light manufacturing |
| Space Requirement | Long rectangular footprint; requires two separate entry/exit points |
| Key Design Feature | Receiving dock at one end, shipping dock at the other; shelving and pick stations in between |
Layout 2: U-Shape Layout
Receiving and shipping zones sit on the same wall, with storage arcing around the back of the warehouse in a U configuration. Workers circulate within the U, with cross-aisles connecting the two sides.
This is the most common warehouse layout type in the industry — and for good reason. It works with a single overhead door, keeps high-activity zones close together, and makes it easy for small teams or solo operators to monitor both inbound and outbound operations from one vantage point.
For small businesses and single-bay warehouse units, U-shape is typically the default starting point.
| Factor | Detail |
|---|---|
| Best For | Small businesses, solo operators, single-bay warehouse units |
| Space Requirement | Square or nearly square footprint; single overhead door works fine |
| Key Design Feature | Receiving and shipping share the front zone; deep storage runs along the back and sides |
Layout 3: L-Shape Layout
Storage runs along two adjacent walls forming an L, with the remaining floor area open for working, staging, or additional storage. Often the natural result of a corner unit or building configuration where two walls make more sense than four.
The open center is the real advantage here. It can be reconfigured for different activities — workbench, vehicle staging, display, studio setup — without disrupting the shelved perimeter. This flexibility makes it popular with creative professionals, contractors, and collectors who need organized storage alongside a functional work zone.
| Factor | Detail |
|---|---|
| Best For | Creative professionals, contractors, collectors, flex/studio users |
| Space Requirement | Adaptable to corner units or irregularly shaped spaces |
| Key Design Feature | Perimeter shelving on two walls; open center zone for work, display, or vehicle staging |
Layout 4: Zone-Based (Modular) Layout
Rather than optimizing for directional flow, the space is divided into clearly defined functional zones — storage, active work, receiving/staging, and office or admin — each with its own dedicated footprint and setup.
Zone-based design is the most adaptable layout for warehouses serving multiple functions at once. A small business might run inventory shelves in one zone, a packing table in another, and a desk or admin corner in a third, all without the zones interfering with each other.
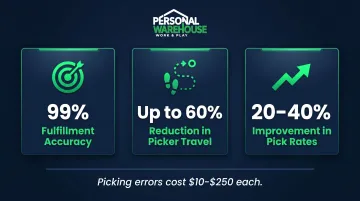
Zone picking strategies can achieve fulfillment accuracy rates of 99%, reduce picker travel by up to 60%, and improve pick rates by 20–40%. With individual picking errors costing between $10 and $250 each, those accuracy gains add up quickly.
| Factor | Detail |
|---|---|
| Best For | Multi-function small businesses, workshops with office needs, subscription box operations |
| Space Requirement | Works in most footprints; benefits from clear aisle marking and visible zone boundaries |
| Key Design Feature | Dedicated zones for each activity; aisles sized for foot traffic or pallet equipment |
Layout 5: Vertical Storage Layout
Instead of expanding the footprint, this layout prioritizes height — using tall shelving systems, pallet racking, overhead storage, and mezzanines to multiply usable square footage without adding floor space.
Vertical lift modules can reclaim up to 85% of floor space compared to traditional static shelving. Mezzanines run $25–$50 per square foot to install versus $50–$100 per square foot for new warehouse construction, roughly 50–75% less per usable square foot, with a payback period around 2.5 years.
For warehouses with fixed footprints that need more capacity, going vertical is typically the most cost-effective path available.
Personal Warehouse units offer customizable mezzanines that expand usable space by up to 30%, adding a full functional level above the existing floor without new construction. Standard LED lighting is included throughout, which matters when you're accessing storage at height.
| Factor | Detail |
|---|---|
| Best For | Storage-heavy operations, collectors, boat/RV-adjacent gear storage, e-commerce with high SKU counts |
| Space Requirement | Minimum 14–16 ft. ceiling height recommended for a single mezzanine level (per IBC: 7 ft. clearance above and below) |
| Key Design Feature | Pallet racking, cantilever shelving, or mezzanine platforms; staircase or lift access; LED overhead lighting |
How to Choose the Right Warehouse Layout for Your Space
Three variables should drive your layout decision before anything else:
- Primary use case — storage-heavy, operations-focused, or creative/personal
- Floor footprint shape — long rectangle, square, or corner unit
- Number of people regularly working in the space
Match the layout to the dominant activity, not every secondary one. A contractor who primarily needs organized parts storage with occasional project work is better served by an L-Shape than a Zone-Based layout with a dedicated admin corner he uses twice a month.
Once you've identified your primary use case and footprint, the next step is avoiding the design decisions that undermine both.
Common Layout Mistakes to Avoid
Most warehouse inefficiency problems trace back to a handful of predictable mistakes:
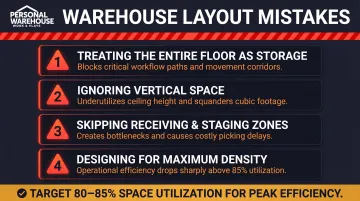
- Treating the entire floor as storage — leaves no clear workflow path; anything moving in or out becomes a disruption
- Ignoring vertical space — floor area is finite; ceiling height usually isn't fully used
- Skipping a receiving/staging zone — incoming inventory ends up blocking active storage, which cascades into picking delays
- Designing for maximum density — industry benchmarks recommend targeting 80–85% space utilization; exceeding 85% causes efficiency to drop sharply from congestion
Most of these are correctable through re-zoning, not expansion. That said, one factor you can't re-zone around is your access points — door placement shapes which layouts are even possible before you move a single shelf.
Access Points Determine Which Layouts Are Viable
The number and position of overhead doors matters as much as floor plan shape:
- Single overhead door → U-Shape or Vertical Storage layouts work best
- Two doors on opposite ends → enables Straight-Flow (I-Shape)
- Corner unit with two adjacent walls → naturally supports L-Shape
Personal Warehouse units include insulated overhead doors and wide drive aisles sized for vehicle access — details that directly affect which layouts will work in your space. For exact door dimensions and configuration options at your location, contact the team at info@personalwarehouse.com or call 303-222-0768.
Conclusion
Getting more out of a warehouse rarely requires more space — it requires the right arrangement of the space you have. The five layouts covered here serve distinct operational realities:
- I-Shape for linear, high-throughput flow
- U-Shape for single-entry small operations
- L-Shape for flexible work-plus-storage setups
- Zone-Based for multi-function operations requiring accuracy
- Vertical for maximizing capacity within a fixed footprint
The right choice depends on what you store, how you work, and how many people move through the space daily.
Once you know your layout, the next step is finding a space that can actually support it. Personal Warehouse offers ownership units designed for real customization — mezzanines, HVAC, restrooms, LED lighting, and flexible interior configurations — for small business owners, collectors, RV and boat owners, and creative professionals across the US. Projects are currently accepting reservations, with delivery in 2026. Explore available units or contact the team at 303-222-0768 or info@personalwarehouse.com to discuss what your layout needs.
Frequently Asked Questions
What is the most efficient warehouse layout?
For high-throughput operations, the Straight-Flow (I-Shape) layout is most efficient — goods move in one direction with no backtracking. For smaller single-entry spaces, U-Shape typically wins. Efficiency depends on footprint shape and how many access points the facility has.
How do I design a small warehouse layout?
Start by defining your primary use case, then identify your access points. From there, assign dedicated zones for receiving, storage, and active work — and prioritize vertical space before trying to expand horizontally. Most underperforming small warehouses need a layout redesign, not more square footage.
What percentage of warehouse space should be used for aisles?
Aisles typically consume 20–30% of total floor space in well-designed warehouses, with total non-storage areas (aisles, staging, receiving/shipping) reaching around 40%. Mobile or high-density shelving systems can reduce that percentage significantly by eliminating fixed aisles.
What is a mezzanine in a warehouse and how does it help?
A mezzanine is a raised steel platform installed above the main floor — effectively a second story without structural construction. It's commonly used to add office space, overflow storage, or a work area above the active warehouse floor, at roughly half the cost of building new square footage.
How much does a 50,000 square foot warehouse cost?
Construction costs for a 30,000–50,000 sq ft facility run approximately $85–$100 per square foot in 2025. Leasing runs closer to $9.51/sq ft annually (national average for facilities under 100,000 sq ft), or roughly $456,000–$550,000 per year including NNN charges. Both figures shift by 20–40% depending on region, building class, and local market conditions.
How do I maximize vertical space in a warehouse?
Start with tall pallet racking or cantilever shelving, then consider a mezzanine platform for overhead storage or workspace. For fully automated retrieval, vertical lift modules (VLMs) are worth exploring. Confirm ceiling height (14–16 ft minimum for a single mezzanine) and floor load capacity before committing to any system.