
Introduction
A man cave bar is the kind of project that sounds straightforward until you're three weeks in, walls opened up, and you've blown past your budget without a tap in sight. The difference between a legendary hangout and an expensive storage room usually comes down to decisions made before a single tool is picked up.
Here's what the numbers say about why this matters: according to a 2024 HomeAdvisor report, the average home bar costs around $8,000, with the full range spanning $1,000 to $30,000 depending on scope. That's a wide gap — and the builds that land at the expensive, disappointing end almost always skipped the planning stage.
This guide walks through the whole process in order:
- Choosing the right space for your setup
- Setting a realistic budget before spending a dollar
- Navigating permits without surprises
- Building the bar structure step by step
- Designing a layout that functions as well as it looks
- Stocking it properly and avoiding the mistakes that derail most builds
TL;DR
- Location comes first — garage, basement, or dedicated unit shapes your layout, utilities, and climate control decisions
- Budget every line item, including electrical, plumbing, and permits; add a 10–20% contingency buffer — the NAHB recommends it
- Bar shape (straight, L-shaped, corner) should be driven by your floor footprint and guest count, not aesthetics
- Lock in the functional layout — kegerator, refrigeration, lighting zones, and seating — before any décor decisions
- Skip permits on electrical or plumbing and you'll face real problems at resale or during an insurance claim
Plan Before You Build: Space, Budget, and Permits
Most man cave bar failures trace back to the first two weeks — specifically, choosing the wrong location or discovering mid-build that the budget can't cover basic utility work. Front-loading these decisions is the highest-leverage thing you can do.
Choosing the Right Location
Three locations suit a man cave bar well, each with distinct trade-offs:
| Location | Best For | Key Considerations |
|---|---|---|
| Garage | Industrial aesthetic, outdoor access | Needs insulation, climate control, GFCI electrical |
| Basement | Separation from living areas, quieter | Moisture risk — over 38% of homes show dampness or mold signs |
| Dedicated outbuilding/unit | Maximum customization, full privacy | Higher upfront cost; requires all utilities from scratch |
For enthusiasts who want a purpose-built space without the constraints of a garage conversion, Personal Warehouse's customizable warehouse units are worth a look. Their units come standard with high-efficiency insulation, all-LED lighting inside and out, and 100/150-amp 3-phase electrical service — enough capacity to run a full entertainment setup, kegerator, refrigeration, and HVAC simultaneously. The company currently has projects accepting reservations across multiple states, including Montana, Colorado, Texas, Wisconsin, Florida, and several others along the East Coast.
Regardless of which location you choose, three utility requirements must be confirmed before committing:
- Electrical: Dedicated circuits for refrigeration, lighting, and entertainment systems
- Water access: Supply and drain for a wet bar sink
- Ventilation: Mechanical ventilation per ASHRAE 62.2 or local code — critical in converted garages and outbuildings
Setting a Realistic Budget
Plan your spend across three tiers:
- Entry-level ($1,000–$5,000): Prefab bar unit, basic refrigeration, minimal electrical work, DIY installation
- Mid-range ($5,000–$15,000): Custom or hybrid bar structure, wet bar sink, dedicated circuits, quality countertop, decent lighting
- High-end ($15,000–$30,000): Full custom build, kegerator, premium finishes, HVAC additions, professional labor throughout
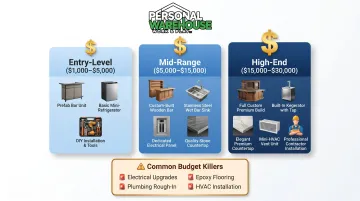
Common budget killers most people underestimate:
- Electrical panel upgrades: $125–$4,500 depending on scope
- Plumbing rough-in for a wet bar sink: plumber rates run $45–$200/hour
- Epoxy garage floor coating: $2–$12 per square foot professionally installed
- HVAC additions for a previously unconditioned space
Always build in a contingency — 10% if using a contractor, 20% if acting as your own general contractor, per NAHB guidance.
Permits and Compliance
Any work involving new electrical circuits, plumbing rough-in, or structural changes almost certainly requires a local building permit. Skipping permits isn't a calculated risk — it's a liability. Unpermitted work can reduce sale price, trigger forced remediation, and complicate insurance claims.
Check local zoning codes and HOA rules before starting. Requirements vary significantly by municipality, and what's fine in one county may require a variance in the next.
How to Build Your Man Cave Bar, Step by Step
With planning locked in, the build breaks into four sequential steps. Skipping ahead creates rework, especially if you close walls before running utilities.
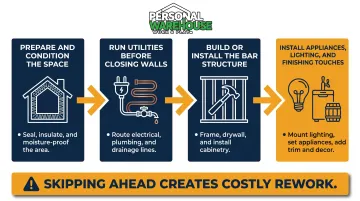
Step 1: Prepare and Condition the Space
Address the structure and environment first, before spending a dollar on furniture or appliances.
For garages:
- Seal or epoxy-coat the concrete floor before any walls or cabinets go in
- Insulate walls to at least R-13 to R-15 (higher in colder climates per ENERGY STAR guidance) and ceilings to R-38 to R-60 depending on climate zone
- Install a properly sized mini-split for year-round climate control. Use ACCA Manual J sizing rather than a rule-of-thumb estimate; oversized units short-cycle and fail to dehumidify properly.
For basements:
- Test for moisture intrusion before finishing any walls. The EPA recommends maintaining indoor relative humidity at 30–50% and drying wet materials within 24–48 hours to prevent mold.
- Address drainage and vapor control at this stage, not after drywall goes up
A bar space that's uncomfortable in July or frozen in January gets used once and abandoned. Climate control belongs in the foundation of the build, not the wishlist.
Step 2: Run Utilities Before Closing Walls
The sequencing here is fixed: rough-in everything before drywall goes up. There's no efficient way to retrofit wiring or plumbing through finished walls.
Electrical:
- Dedicated circuit for kegerator or refrigerator
- Separate circuit for lighting
- Circuit for TV and entertainment systems
- All wet bar receptacles must be GFCI-protected per NEC 210.8(A)(7) (2023 code)
- Get rough-in inspected before closing walls
Plumbing follows the same logic: run lines now, before anything is enclosed.
Plumbing (if building a wet bar):
- Run supply and drain lines at this stage
- Confirm local code requirements for trap and venting on a basement or garage bar sink, as requirements vary by jurisdiction
Step 3: Build or Install the Bar Structure
Three main approaches exist, each with different trade-offs:
- Full DIY framing: Most customizable, requires real carpentry skills
- Flat-pack/modular bar unit: Easiest installation, least custom
- Hybrid (pre-built base + custom countertop): Best balance of cost and customization for most first-time builders
Dimensions that matter every time someone sits down:
- Bar height: 42–48 inches for standing/bar stool use
- Bar top depth: 18–30 inches minimum for comfortable elbow and glass placement
- Bartender aisle behind bar: 30–36 inches
- Bar stool spacing: 24 inches center-to-center
Countertop material comparison:
| Material | Spill Resistance | Maintenance | Best For |
|---|---|---|---|
| Quartz | High (non-porous) | Low — no sealing | High-use bars |
| Butcher block | Low–moderate | Regular oiling required | Warmth/aesthetics |
| Epoxy resin | High (seamless) | Low | Custom artistic looks |
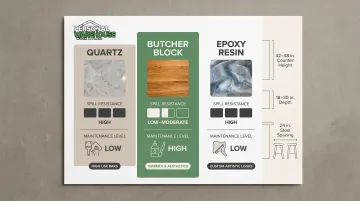
For a man cave bar where spills are guaranteed, quartz is the most practical choice. Butcher block looks great but requires consistent upkeep.
Step 4: Install Appliances, Lighting, and Finishing Touches
Appliances:
- Position the kegerator and under-counter fridge for access from both sides of the bar
- Confirm ventilation clearances per manufacturer specs; inadequate clearance kills compressors prematurely
- The kegerator is typically the single most-used appliance; it's worth allocating real budget here
Lighting: use a layered approach:
- Ambient overhead: General illumination for the whole space
- LED strip lighting: Under shelves and along the bar base for atmosphere
- Pendant lights: Over the bar top to define the serving zone
Lighting shapes how the space feels more than almost any other finish decision. The cost is low compared to structural work, and the impact on atmosphere is immediate.
Design Themes and Bar Layout Options
Decide on your theme before buying a single piece of furniture. Mismatched elements picked up at different stages are the fastest way to end up with a space that looks accidental rather than intentional — and fixing it later costs more than planning it right the first time.
Bar Layout: Straight, L-Shaped, or Corner
Before choosing a shape, measure your footprint and calculate how many bar stools (at 24 inches each) you can realistically fit.
- Straight bar: Best for narrow spaces; clean sightlines to a wall-mounted TV
- L-shaped bar: Handles larger groups well; naturally separates serving from mixing areas
- Corner bar: Maximizes efficiency in square rooms; fits where other layouts don't
Picking a Theme and Finishing the Space
The most popular themes — and what they need to work:
- Sports bar: Multi-screen TV setup, team colors, open shelf display for memorabilia
- Industrial/garage: Exposed metal, Edison bulbs, concrete floors, utilitarian shelving
- Rustic whiskey lounge: Reclaimed wood, leather seating, warm lighting, back bar with bottle display
- Retro/arcade: Neon signs, vintage memorabilia, game machines as focal points
Flooring options by location:
| Flooring | Moisture Resistance | Cost (Installed) |
|---|---|---|
| Epoxy/polyaspartic | High | $4–$12/sq ft |
| Luxury vinyl plank (LVP) | Waterproof | $4–$16/sq ft |
| Porcelain tile | Very high | $10–$50/sq ft |
Wall treatments that add character:
- Single accent wall with a bar back display and open liquor shelving
- Chalkboard wall for drink specials or sports scores
- Pegboard for tool-themed or workshop-adjacent setups
How to Stock and Equip Your Man Cave Bar
Finalize the build before buying appliances or large spirit quantities — purchasing before the space is done leads to size mismatches and storage headaches. (This order matters more than most guides admit.)
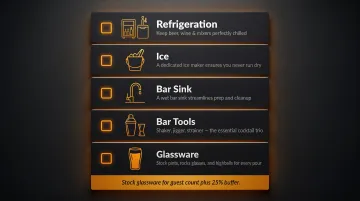
Essential Equipment Checklist
- Refrigeration: Under-counter fridge or kegerator (kegerators earn their cost quickly for beer-focused crowds)
- Ice: Dedicated ice maker or reliable access ; this gets overlooked more than any other item
- Bar sink: Running water is the difference between a real bar and a glorified drink cart. A portable option works if plumbing isn't possible.
- Bar tools: Shaker, strainer, jigger, muddler, bottle opener — these cover 90% of what you'll actually make
- Glassware: Stock for your typical guest count plus 25% buffer
Stocking the Bar and Entertainment Setup
Stock to your crowd, not a generic template:
- Craft beer focus: Prioritize refrigeration and a tap system
- Spirits-forward group: Tiered back bar shelving, 6–10 core bottles covering whiskey, vodka, rum, gin, tequila, and a few mixers
- Sports-watching crowd: Canned and bottled options over complex cocktail setups for easy access
For entertainment, plan the layout alongside the bar. Both compete for the same wall and floor space, so decisions made separately create problems later.
At minimum, include:
- Wall-mounted TV at eye level from bar stools
- Sound system calibrated for background listening, not concert volume
Optional additions like a dart board, pool table, or arcade machine need floor space allocated in the initial layout — not squeezed in after the fact.
Common Mistakes to Avoid When Building a Man Cave Bar
Most disappointments trace back to three predictable errors:
Skipping permits: Unpermitted electrical or plumbing work invites real consequences: a lower sale price, forced remediation, and insurance complications. A permit costs far less than retroactively fixing unpermitted work after a sale falls through.
Underestimating climate control: A bar space that's sweltering in August or freezing in January sits empty regardless of how good it looks. Size HVAC using ACCA Manual J (not rules of thumb) and treat it as a core budget line, not an upgrade. This matters especially in garage and outbuilding setups.
Prioritizing aesthetics over function: The most common pattern is spending heavily on décor before finalizing bar height, seating count, appliance placement, and traffic flow. A beautiful bar that seats two fewer people than planned, or positions the kegerator where no one can access it comfortably, misses the entire point.
Frequently Asked Questions
How much does it cost to build a man cave bar?
Costs range from roughly $1,000 for a basic dry bar setup to $30,000 for a fully custom wet bar with premium finishes and HVAC. The average sits around $8,000. Always budget a 15–20% contingency — electrical and plumbing surprises are the most common overruns.
Do I need a permit to build a man cave bar?
Yes, in most cases. New electrical circuits, plumbing rough-in, and structural wall changes all typically require permits. Check with your local building department before starting — requirements vary by municipality, and skipping permits creates real liability down the line.
What is the standard height for a man cave bar?
Standard bar height is 42–48 inches, designed for use with bar-height stools (28–32 inch seat height). Counter-height bars at 36 inches pair with counter stools and work better if the space doubles as a workspace.
How much space do I need for a man cave bar?
Plan for a minimum of 8–10 feet of wall space for the bar structure itself and roughly 100–150 square feet total to accommodate the bar, stools, and a clear 30–36 inch traffic path behind seated guests.
What should I stock in my man cave bar?
Start with what your regular group actually drinks. A solid foundation covers whiskey, vodka, rum, gin, and a few key mixers — roughly 6–10 bottles handles most requests. A well-stocked beer selection (draft or bottled) rounds it out; in a home bar, depth in a few categories beats spreading thin across everything.
Can I build a man cave bar in a garage or dedicated warehouse unit?
Garages and dedicated units are among the best man cave bar locations — they offer separation from the main house, customization flexibility, and existing floor space. Address insulation, climate control, and electrical capacity first. Personal Warehouse units include 100/150-amp 3-phase service, high-efficiency insulation, and optional wet bar and HVAC configurations, making them a strong fit for this type of build.